Showing posts with label dessert. Show all posts

Tuesday, December 17, 2013

Vegan beignets

I love pastry. I love it so much. It was one of those things that I had to sacrifice the day I decided to go vegan because most pastries contain one of or a combination of milk, butter and eggs. The reason I went vegan was because I enjoy the healthy lifestyle and so although I don't eat as much pastry, I'm not too bothered by it. But, that's not to say that if I find a vegan version of my favourite pastries then I won't eat it. Trust me, I'll eat it. In fact, try stop me from eating two more after demolishing the first one.

I have found that most sweet baked goods can be made with a vegan friendly recipe, and I love a good challenge trying to find veganised recipes. I was told about a delicious pastry called a beignet which is derived from the French word for "bump". I guess it's called that because it's deep fried dough which looks a little bit like a round bump. It's very popular in America, particularly in New Orleans where they are the specialty at Café du Monde. After spending some time searching for a recipe that I thought would taste the best, I settled for one I found from the site Eff Yeah It's Vegan. How could you not pick a recipe from a website with a cool name like that?

I made a few adjustments here and there and set off on a wonderful baking journey today :) Little did I know that these beignets would be one of the yummiest things I've ever eaten. Seriously, you won't understand until you try one. 

The beignets are so unbelievably soft and fluffy on the inside. All this soft fluffiness is encased in a crispy golden deep fried outer layer. And the icing sugar which is piled on top. Yes, it has to be  piled on top. It just completes the pastry and makes the world feel right. You may think I'm making a big fuss out of something to small, but it's because you just don't get this kind of thing in Perth; and if you do, I don't know where to find it, and it's probably not vegan. 

My life is a little better, and my tummy is a lot happier now that I've tasted beignets. Whether you try my vegan recipe, or make yourself the traditional beignet recipe, you will not be disappointed. Having eaten about 4 of them already, I could go for another 4 right now. But I won't, because then I'll get icing sugar all over my keyboard. Although, I'd probably just lick it off. 


Vegan beignets (Adapted from Eff Yeah It's Vegan)

Ingredients
  • 1 cup warm water
  • 1/4 cup sugar
  • 1 Tbs active dry yeast
  • 1 egg replacement (I used No-Egg)
  • 2 Tbs vegan shortening (i.e. vegetable shortening)
  • 1/2 cup soy milk + 1 teaspoon sunflower oil
  • 4 1/4 cups all-purpose flour
  • 1/2 tsp salt
  • Oil for frying (I used sunflower oil. About 2L of it)
  • Enough powdered sugar to choke out an army. Yes, that is actually how much you need. Don't be shy now. The more the better.
Directions:
  1. In a stand mixer or mixing bowl, combine the water, sugar and yeast. Allow to sit until the yeast gets bubbly and happy, about 5 minutes. Add in the egg replacement and beat until combined. Add in the soy creamer, the shortening and half the flour and beat for 1 minute. Add in the salt and the rest of the flour and finish with the dough hook. If you don't have a dough hook, knead the dough by hand. 
  2.  Spray cooking spray or a light bit of oil into a bowl or dish with a lid. add in the dough and turn to coat. Cover and allow to sit in the fridge for 8 hours, or overnight. 
  3. Heat your cooking oil to 360 degrees F. On a lightly floured surface, roll out your dough to approximately 1/4 to 1/3 inch thickness. 1/2 inch thick is too thick. 
  4. Cut the dough into 3" x 3" squares or diamonds. Place into the hot oil carefully, making sure not to crowd the oil. The beignet should float to the surface almost immediately. Cook on each side for about 20-30 seconds, or until a rich golden brown. 
  5. Once golden brown on both sides, remove from oil and allow to rest for about 1 minute. With a sieve, sprinkle the powdered sugar generously onto the top of the beignets. Enjoy, traditionally with a cafe au (almond) lait.

It's best not to stack them. They will expand and stick together!


Monday, October 28, 2013

Vegan butterscotch crème brûlée

I hit the vegan dessert jackpot today when I tried a recipe I found for vegan crème brûlée. I've been looking around for a good crème brûlée recipe for a while now and was tossing up between a few. I made my final decision when I came across a website which listed 9 Vegan French Dessert Recipes. The link took me to a recipe from Vegan Good Eats. I had come across this recipe before, and it was on my list of ones to try but since it was such a straight forward recipe I decided it was going to be the one. 

While I was gathering up all of my ingredients I thought that I had run out of vanilla essence so I decided to substitute it for half the amount of butterscotch essence that I bought from Weigh 'N' Pay. There are times in life when you know you made a really good decision, and this was one of them. The butterscotch essence made this taste like some high quality creme caramel. I'm actually so impressed with this recipe. The texture was what I wanted it to be. Smooth and creamy. 

This recipe is also a bit healthier than your average non-vegan crème brûlée. There was none of that cream or coconut cream (that some other vegan recipes use) which is quite high in bad fats. This is definitely a good alternative to the usual decadent creme brulee. 

This vegan crème brûlée also was so quick and easy to make. It was ready within an hour of starting. 

So in conclusion, what more could you possibly want from a dessert? It's tasty, easy and guilt-free :)


Vegan crème brûlée
Recipe adapted from Vegan Good Eats

Makes 4 large ramekins
 
Ingredients:
  • 3 cups unsweetened almond milk (I used 2 cups almond milk and 1 cup soy milk...but that's only because I ran out of almond milk)
  • 1/3 cup cashew butter (You can also just use a heaped 1/3 cup of raw cashews and put them in the food processor on high until it forms a paste)
  • 1/2 cup maple syrup
  • 1 tablespoon sugar
  • 1 teaspoon vanilla extract (I used 1/2 teaspoon butterscotch essence)
  • 1 teaspoon arrowroot powder
  • 3/4 teaspoon agar powder (not flakes)
Directions:
  1. Place all the ingredients in a blender and go to town until smooth.
  2. Strain through a sieve. You’ll remove some of the impurities of the cashew butter.
  3. Let sit for 10 minutes, enough for the agar to soak up. Bring to a boil slowly, stirring frequently. Once it boils, reduce the heat and stir constantly for five minutes. Do not walk away as it only takes a few seconds for the mixture to over boil and overflow.
  4. Distribute between six ramekins and allow to set for 30-45 minutes at room temperature. You can serve it either at room temperature or put them in the fridge and serve them cold (Agar actually does not need refrigeration to set, so it will set nicely either way)
  5. Sprinkle a think layer of sugar on top and using a torch, brûlée the crème. Although you can also use the broiler for this, make sure the oven door is open while you do to avoid recooking the custard. It’s a little trickier.


Tuesday, October 8, 2013

Vegan ice cream taco

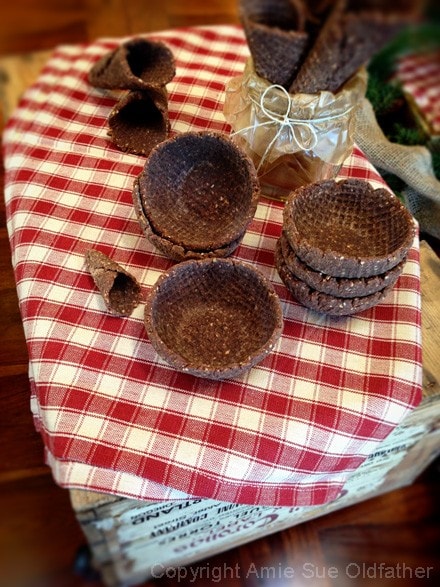
Forget all the good vegan recipes you think you know for vegan waffle cones. I have found what I think to be the best one yet. It's flavoursome, crispy and can be raw too!

The recipe is from Nouveau Raw. They give you great tips for how to make waffle cones, waffle bowls and cookies. Pretty much just anything to put your ice cream into.

I love that this recipe is raw, but I didn't have the time to wait 10 hours for it to dehydrate so I put mine into the oven for an hour at 150 degrees C. But the time can vary depending on your oven. Just keep an eye on it and take it out when it is crispy enough for your liking.

I made my own adaptation to the recipe as I didn't want to make mine chocolate waffle cones. I was already going to be smothering my ice cream taco in chocolate so I figured it would be too much chocolate if I put it into the shell as well. I substituted the cocoa powder for hazelnut meal.

The ice cream taco was DELICIOUS by the way :) Deliciously unhealthy that is. I could only eat half of it in one sitting though. Iy's probably better that way. If I'd have eaten the whole thing, I'd most likely go into a month long sugar coma.


Vegan Nut Waffle Cones
Adapted from Nouveau Raw

Ingredients: 
  • 3/4 cups cashews, soaked 2+ hours
  • 1/2 cup flax seed, ground
  • 1/2 cup hazelnut meal
  • 1 tsp ground cinnamon
  • 1/4 tsp sea salt
  • 1 ripe banana
  • 1/4 cup raw coconut butter or creamed coconut (pretty much just anything with both the flesh and the oil creamed together)
  • 1/4 cup maple syrup
  • 1/4 tsp liquid stevia (optional) - I didn't include this
  • 6 cups packed, moist almond pulp

Directions:

  1. Preheat oven to 150C.
  2. After soaking the cashews, drain and rinse them.  If you already have soaked and dehydrated cashews in the pantry, you can use those.
  3. Place the cashews in the food processor, fitted with the “S” blade, and process until it resembles a small crumble.   Place in a large bowl.
  4. Add the ground flax, hazelnut meal, cinnamon and salt.  Mix.  Set aside.
  5. In the same food processor bowl combine the bananas, creamed coconut/coconut butter, maple syrup, and stevia (if using).  Process until creamy.   Pour over the dry ingredients, add the almond pulp and mix together with your hands working everything in together.
  6. Measure out 1/4 cup of batter and roll into large balls.  Do this until all of the batter is gone.
  7. To make the cone with the waffle maker:
    • Line the waffle cone machine with plastic wrap, place the ball of batter in the center and lay another piece of plastic wrap over the top.
    • Close the machine and squeeze shut.
    • Open, peel off the top piece of plastic wrap and remove the flattened waffle cone.
  8.  I then used aluminium foil to make a taco shell mold and placed the flattened waffle cone in here.
  9. Place the taco shell in the oven at 150C for about 45mins-1 hour but keep an eye on it and take it out when it is crispy enough for you. 
To make the ice cream taco:
  • Melt a block of vegan chocolate and mix in a handful of chopped almonds or any nut of your choosing
  • Once the taco shell has cooled down completely, scoop in some vegan ice cream. I mixed ice cream and banana together. 
  • Coat the taco with the melted chocolate and place in the freezer for a minimum of 20 minutes. 
  • Enjoy!!!

Tuesday, September 17, 2013

Vegan sticky date mug pudding

I had about 2 hours to do something new today. I've been flat out busy today and I got home at 10pm in desperate need of something new. Luckily, I had the idea to make a microwave cake in a mug as I was on my way home. I decided on sticky date pudding because I have not had this since before my vegan days...which is about 2 and a half years now. 

I was worried that I wouldn't be able to find a vegan recipe, but Veggieful was one step ahead of me and had a recipe for a vegan 2 minute sticky date mug pudding. How good is that! 

I ended up making some changes to the recipe in an attempt to make it a bit more healthy :)

This was a perfect way to end my cold and busy day. This incredibly fluffy and delicious dessert was so quick and simple. This will definitely be my future sugar fix. 


Vegan Sticky Date Mug Pudding

Serves 1

Ingredients
  • 6 pitted dried dates, finely chopped
  • 1 1/2 tablespoons plain-flavoured oil (I used sunflower)
  • 1 tablespoon agave nectar
  • 3 tablespoons plain flour
  • 1/8 teaspoon baking powder
  • 1/8 teaspoon bi-carb soda
  • pinch salt
  • 1 teaspoon flax meal
  • 3 teaspoons water
  • 3 tablespoons soy milk
Directions
  1. Combine the flax meal and water in a bowl, mix and leave in fridge to set for 15 minutes
  2. Add all ingredients to a bowl (including the set flax meal) and whisk vigorously until combined and air has been incorporated into the mixture. (Or preferably, use a processor)
  3. Pour the mixture into the mug and put into the microwave.
  4. Microwave the mixture on high heat for 1 minute 45 to 2 minutes until fluffy.
  5. Pour some maple syrup over the pudding.
  6. Serve immediately and enjoy!

Sunday, August 11, 2013

Vegan berry and apple crumble

I love getting to the point in a friendship where you can just come around in your PJ's, eat the food from their kitchen and having them be OK with it all. 

That was what the girls and I did tonight. We caught up to catch up on Ruth's holiday over some baking and hot drinks. 

We were in the mood for apple pie but decided to go with a berry and apple crumble recipe I found in my Now Vegan! cookbook by Lynda Stoner. It was a very quick and simple recipe and it tasted really good. 

We made our own variations to the original recipe. We halved the amount of sugar and added cranberries, walnuts, sunflower seeds and some almond and hazelnut meal. All the flavours went well together and made the simple dessert into something a bit more special. 

You can modify this recipe in any way you like. Add all your favourite things and enjoy this in the company of people you love being around :)


Vegan Berry and Apple Crumble

Serves 6

Ingredients
  • 4 large apples, peeled and thinly sliced
  • 500g (1 lb) mixed berries, fresh or frozen
  • 1/2 cup vegan margarine
  • 1 cup dark brown sugar (we only used 1/2 cup)
  • 1 cup wholemeal self-raising flour (we used plain flour)
  • 1 tablespoon cinnamon
Directions
  1. Preheat oven to 180C (350F).
  2. Grease a 20cm (8in) baking dish (we make ours in ramekins). Place the sliced apples on the bottom and top with berries.
  3. With your fingers, rub together the flour, vegan margarine, brown sugar and cinnamon until finely crumbed, then spread evenly over berries.
  4. Bake in oven for 30 minutes.

Friday, August 2, 2013

Vegan apple strudel

I had a dinner party tonight and guests were bringing a dish to share. I whipped out my cookbooks and I found a great recipe for apple strudel. The reason I chose it was because the ingredients included hazelnut meal and I had quite a bit left over from making my hazelnut cupcakes the other day. I was trying to think of how to use up the hazelnut meal yesterday, and so things turned out pretty well. 

My friend had also told me about how she found vegan puff pastry in the grocery store the other week during my prac. The apple strudel recipe also needed vegan puff pastry. I think the stars aligned and it was destined for me to make this apple strudel today :P

I found the recipe in my Native Foods cookbook. I bought it during my trip to America late last year. If you live in the States and have a Natives near you, please you check it out. You'll be doing yourself a big favour by trying out their delicious vegan meals. 

Also, check out the Native Foods recipe blog!

The recipe was supposed to make 2 strudels, but I managed to get one big one out of it. This goes lovely with ice cream and dusted with icing sugar for decoration. 

Stay tuned for the recipe. I'll try and post it soon :)


Served with homemade vegan vanilla ice cream

Wednesday, July 24, 2013

Vegan chocolate pudding cake

I've been having gum problems lately :( I've had receding gums for a long time and they're normally OK because I do my best to keep my teeth clean and my gums healthy, but lately my gums on the bottom teeth have been inflamed and incredibly painful. 

Sadly, lots of chewing makes it worse, so I decided to make myself soft foods today. I started dinner off with a super healthy soup made of lentils, zucchini, broccoli and spinach. I got the recipe from a cookbook called Vegan Meals For One or Two by Nancy Berkoff. It looked like green mess, but it tasted lovely and I felt super healthy slurping it down. 

I'm a person who likes a bit of balance, and since I had a healthy carb free dinner, I decided to whip up a vegan chocolate pudding cake for dessert. 

I came across a few recipes, but I picked the one from the website Foodie Fiasco because it was the healthiest option I could find. I made my own variations so that it would be even more guilt-free :)

I divided the batter up into 4 ramekins and shared one with my brother after they were done in the oven. The pudding was so yummy! When I asked my brother how it tasted he said "I give it a 4 and a half....out of 4 and a half". Cheeky boy had me a bit disappointed in my own cooking skills for a second there :P

This is a seriously great winter dessert. I like sharing my food, so the ramekins were perfect for that...but I honestly could have downed a whole one all to myself. They are just that delicious. 

Vegan Chocolate Pudding Cake

Serves 8

Ingredients
    For cake:
  • ½ cup agave nectar
  • 1 cup whole wheat or almond flour (I used ½ plain flour and ½ wholemeal spelt flour)
  • ¼ cup cocoa powder
  • 2 teaspoons baking powder
  • ¼ teaspoon sea salt
  • ½ cup unsweetened almond milk
  • 1/3 cup applesauce (I just pureed an apple in my food processor)
  • 1 1/2 teaspoons vanilla extract
    For sauce:
  • 1/3 cup baking sweetener
  • 1/3 cup brown sugar
  • ¼ cup cocoa powder
  • 1 ¼ cups hot water
Directions
  1. Preheat oven to 180°C (350°F). Spray an 8x8 baking dish with cooking spray and set aside (or use 4 big ramekins).
  2. To make the cake, combine the agave nectar, flour, cocoa powder, baking powder, and sea salt in a large bowl. Add in the almond milk, applesauce, and vanilla extract and stir until completely combined. Spread the mixture into the prepared baking dish or ramekins and smooth out the top with an offset spatula or a spoon. Set aside.
  3. For the sauce, combine the sweetener, brown sugar and cocoa powder in a medium bowl. Sprinkle evenly over the batter. Pour the hot water over the batter. Do not stir the water in! I know it looks weird, but it’s okay. It’s all going to be okay.
  4. Bake in the oven at 180°C (350°F) for about 25 minutes. It should resemble an undercooked brownie. Let cool for at least 15 minutes. When serving, spoon the sauce from the bottom of the pan over the cake.Good luck trying to share this!...I actually want another one right now.

Tuesday, July 23, 2013

The Llama Bar, Subiaco

My friend once told me how much he enjoyed chips cooked in duck fat, and so for his birthday I did some searching for restaurants in Perth that served duck fat roasted chips. I could only find three places, and two of them had ridiculously high prices from the items on their menu. The only place within my price range was the Llama Bar in Subiaco. 

On Tuesdays and Wednesday they have steak night, where you can get a 250g sirloin steak, duck fat chips, salad and béarnaise sauce all for...get this...$15!! That's so cheap! All you non-vegans out there definitely need to get your next steak fix from the Llama Bar. 

The kitchen was very helpful with finding me a vegan friendly meal, and ended up making me a beautiful cabbage salad which had cabbage, red onion, capers, peas, radish and basil. It was such a lovely fresh salad which had a bit of a spicy tang to it. It was very filling too. I also ordered sweet potato crisps which were perfectly thin and crispy and so full of flavour. 

My friend ordered the braised lamb and from where I was sitting it looked so tender and moist. I'm guessing it was absolutely delicious too. 


The decor was very elegant. I was actually quite blown away by how lovely it was inside. The lighting is slightly dimmed, with a lovely glow from the lights. It's a very neat and tidy place, with lots of large pictures on the walls and flow arrangements. It seems too fancy to have meals at such reasonable prices. There was also live entertainment from a singer who had a very Regina Spektor voice. 


Unfortunately there wasn't anything vegan friendly on the dessert menu, so we headed across the road to Gelare where they had vegan ice cream! There was vegan dark chocolate and dairy-free naked coconut flavour. I had a scoop of each of course. Even though the weather was cold, it didn't matter because vegan ice cream makes me so happy.


Tuesday, June 4, 2013

Blogilates healthy ice cream sandwich

I follow the Blogilates super star Cassey Ho on Instagram and I saw a post of her a while back for healthy ice cream sandwiches. 

My friend Ruth made these the other day and when I Googled the recipe and found out that you only need two ingredients I figured how could I not make these?

The recipe is so dead easy and these are indeed very healthy. Hop onto the Blogilates website to view the recipe along with other awesome Blogilates related stuff.


Blogilates cheap clean eats ice cream sandwiches

Serves 2

Ingredients: 
  • 2 ripe bananas
  • 1 cup of rolled oats (dry)

Directions:
  1. Dice banana into coins and freeze for a few hours or overnight
  2. Place dried oats into a food processor and grind into oat flour
  3. Pour oat flour into a bowl and mash with other banana with hands until a dough forms
  4. Make 4 cookies and place in oven for 15 min at 350F (or 180C)
  5. Cool cookies completely
  6. Take frozen banana coins and put them into the food processor and blend for 1-2 min until it forms a cream! (It’s like magic!)
  7. Scoop ice cream onto cookie, sandwich it…
 **I made my cookies chocolate by adding 1 teaspoon cocoa powder. Make sure you use bigger bananas if you are going to add cocoa powder or else the dough won't stick and will just crumble. 

Sunday, February 24, 2013

White nectarine vegan ice cream

Since going vegan some of my new favourite recipes have been a result of trying odd flavour combinations. A few examples include ginger-roasted carrots with miso dressing and black glutinous rice, eggplant and tahini sauce, and the strangest of them all, peanut butter and tomato on toast. You all just pulled a face didn't you? Yeah that's what I did when I saw a nurse that I once worked with eating it for lunch. But trying new things can sometimes lead to new loves. 

Today I found some beautifully ripe white nectarines in my fridge and googled some vegan recipes on the net. I came across a recipe for vanilla, maple and nectarine vegan ice-cream which caught my eye because I've never had nectarine ice cream before. I'm glad I tried it because it was very refreshing and tasted even better served with mangoes from my back garden. 

A perfect summertime dessert.